Using a PN532 NFC Module With Libnfc
Overview
Recently I lost my wallet, and with it my access card to my apartment building. Unfortunately, a replacement card cost me $100 (thanks Meriton!). Armed with spitefulness that could power a thousand suns, I took it upon myself to better understand how NFC works and how to read cards in Linux (libnfc is unofficially supported in Windows, but you’re on your own)
This guide isn’t about cloning cards, breaking encryption using mfcuk or mfoc but it is about installing libnfc (which is required by those two tools) and using the PN532 NFC module.
Hardware Required
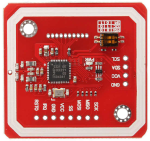 | PN532 NFC RFID Module (I bought mine on eBay for $25.97 AUD) |
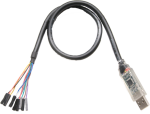 | USB to TTL Serial UART RS232 Adaptor (optional) |
Compiling libnfc with pn532_uart
It is very unlikely that your Linux distribution has libnfc with PN532 support already configured within it’s repositories, so you’ll need to build it from source.
- Download the latest version of libnfc, at the time of writing this is 1.8.0 but check their GitHub to confirm
$ wget https://github.com/nfc-tools/libnfc/archive/refs/tags/libnfc-1.8.0.tar.gz
- Extract, and enter the directory
$ tar zxf libnfc-1.8.0.tar.gz && cd libnfc-libnfc-1.8.0
- Install
autoreconf(if not already installed)
# Arch
$ sudo pacman -Syu automake

# Debian/Ubuntu
$ sudo apt-get install autoconf
- Configure and build
$ autoreconf -vis
$ ./configure --with-drivers=pn532_uart
$ make
$ sudo make install
Confirm after running ./configure that the last thing printed is:
Selected drivers:
   pcsc............. no
   acr122_pcsc...... no
   acr122_usb....... no
   acr122s.......... no
   arygon........... no
   pn53x_usb........ no
   pn532_uart....... yes
   pn532_spi.......  no
   pn532_i2c........ no
   pn71xx........... no
Connecting the PN532 NFC module
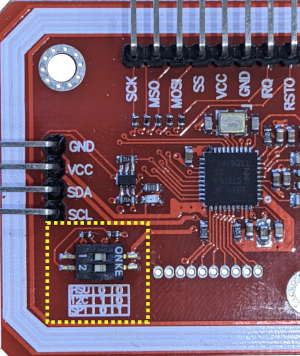
You’ll likely have a DIP switch on your NFC module that configures whether to use UART (might be labelled HSU for High Speed UART), I²C, or SPI. If you’re using an UART to USB adapter, you’ll need to configure the switch appropriately, which means having both toggles in the off position (marked as 0).
It’s possible to connect this directly to a Raspberry PI and use I²C, or even connect it to an Arduino and in turn connect the Arduino to your PC. Both of these are outside the scope of this article, but you can find many guides on how to configure it appropriately.
On your UART-to-USB adapter you should have 4 pins (the colours might differ)
| UART | NFC Module |
|---|---|
| Red (+5V) | VCC |
| Black (GND) | GND |
| White (RXD) | SDA |
| Green (TXD) | SCL |
The Linux kernel has had mainline support for the cp210x driver for quite sometime, so it shouldn’t be necessary to install any additional drivers.
Once you’ve wired them up, confirm that Linux recognises it by running dmesg
and looking for output like the example below. Paying special attention to the
TTY device that it attaches to (in this example: ttyUSB0)
[  592.921962] usb 3-2: new full-speed USB device number 4 using xhci_hcd
[  593.093384] usb 3-2: New USB device found, idVendor=10c4, idProduct=ea60, bcdDevice= 1.00
[  593.093403] usb 3-2: New USB device strings: Mfr=1, Product=2, SerialNumber=3
[  593.093409] usb 3-2: Product: CP2102 USB to UART Bridge Controller
[  593.093414] usb 3-2: Manufacturer: Silicon Labs
[  593.093418] usb 3-2: SerialNumber: 0001
[  593.104055] cp210x 3-2:1.0: cp210x converter detected
[  593.104747] usb 3-2: cp210x converter now attached to ttyUSB0
Configuing libnfc and confirming the module works
By default, libnfc will use the configuration file found at /usr/local/etc/nfc/libnfc.conf to know how to interact with the NFC module.
Create a file with the below contents, making sure to point to the correct TTY device (for me, this is /dev/ttyUSB0) you can find yours by looking at dmesg
$ cat /usr/local/etc/nfc/libnfc.conf
device.name="pn532"
device.connstring = "pn532_uart:/dev/ttyUSB0"
device.optional = false
Now, to bring it all together and verify that everything is working, simply run the following command from the root of the libnfc folder you extracted:
$ sudo ./utils/nfc-scan-device -v

~/git/libnfc-libnfc-1.8.0/utils/.libs/lt-nfc-scan-device uses libnfc 1.8.0
1 NFC device(s) found:
- pn532:
    pn532_uart:/dev/ttyUSB0
chip: PN532 v1.6
initator mode modulations: ISO/IEC 14443A (424 kbps, 212 kbps, 106 kbps), FeliCa (424 kbps, 212 kbps), ISO/IEC 14443-4B (106 kbps), ISO/IEC 14443-4B' (106 kbps), ISO/IEC 14443-2B ST SRx (106 kbps), ISO/IEC 14443-2B ASK CTx (106 kbps), ISO/IEC 14443-2B-3B iClass (Picopass) (106 kbps), Innovision Jewel (106 kbps), Thinfilm NFC Barcode (106 kbps), D.E.P. (424 kbps, 212 kbps, 106 kbps)
target mode modulations: ISO/IEC 14443A (424 kbps, 212 kbps, 106 kbps), FeliCa (424 kbps, 212 kbps), D.E.P. (424 kbps, 212 kbps, 106 kbps)
Congratulations, libnfc is correctly using your NFC module!
Troubleshooting
If things aren’t working correctly, here’s a few things you can try:
| Problem/Symptom | Solution |
|---|---|
Invalid serial port: /dev/ttyUSB0 | Run nfc-scan-device as root, and confirm the correct TTY device |
pn53x_check_communication error | Ensure the wiring on your UART adapter is correct |
If you run into a problem that’s not covered here, try increasing the verbosity in libnfc by setting the LIBNFC_LOG_LEVEL environment variable, for example:
$ sudo LIBNFC_LOG_LEVEL=3 ./utils/nfc-scan-device
Conclusion
This should be everything you need to use the PN532 NFC module with libnfc. From here you can start to explore the many tools and software that use the library.
If you’ve got any questions, please feel free to leave a comment!